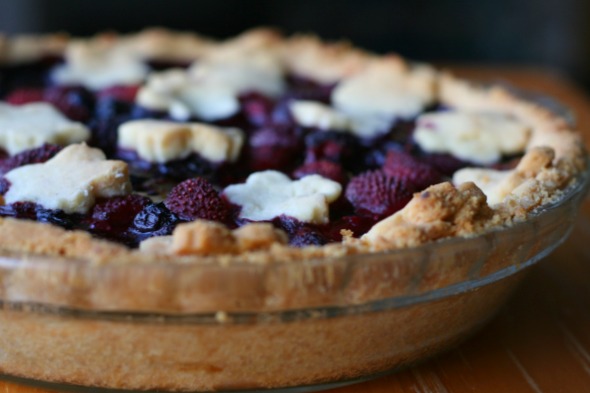
Gluten-Free Berrylicious Pie
Can you believe it’s already mid-September? It feels like I was just having my last Summer party and woosh, just like that we’re on the bottom half of the calendar. There really is only one thing to do and that’s enjoy it. Enjoy Fall and all that it has to offer. The thing is, the season is real short here in Ontario and before we know it, we’re knee deep in snow. So, before the month of September wizzes on by, I want to relish in the beauty of Autumn. Hence the pie.
The pie, is not full fledge Fall, pumpkin pie to come... however, filled with dark berries and cinnamon, its deep, rich, belly-warming nature is definitely Fall-like. Especially paired with a mug of hot cocoa and coconut cream. Yahoo, now that’s delighting in Fall baby!

As for me, I’m putting up my flip flops, pulling out my loafers and humming Autumn Leaves by Nat King Cole…. “The falling leaves drift by the window The autumn leaves of red and gold I see your lips, the summer kisses The sun-burned hands I used to hold…”
1 pie dough for top and bottom crust ( I used this one and made it with coconut oil)
5 cups of berries, rinsed (if using frozen berries, defrost and drain them)
1/3 cup coconut sugar
1 teaspoon lemon juice
1 teaspoon lemon zest
1/2 teaspoon ground cinnamon
1/4 teaspoon nutmeg
3 Tbsp tapioca flour/starch
- In a large mixing bowl, place berries, sugar, lemon zest, lemon juice, cinnamon, nutmeg, and tapioca starch. Gently fold the berries until they are coated.
- Preheat oven to 400°F. You should have two balls of pie dough, one for the bottom crust, one for the top crust. Roll out one of the balls of pie dough on a lightly floured surface to 12-inch diameter for a 9-inch pie pan.
- Line the bottom of your pie pan with the dough. Chill in refrigerator while you roll out the top crust.
- Roll out the second ball of pie dough for the top crust; use cookie cutters for a fun top crust or create a lattice for a classic look.
- Spoon the berry mixture into the prepared pie dish and add top dough.
- Place the pie on the middle rack of the oven. Put a baking sheet on the lower rack to catch any juices that might bubble out of the pie while it’s cooking.
- Bake the pie in two stages. First bake it at 400°F for 30 minutes. Then place a sheet of aluminum foil over the pie to protect the edges and tops from getting too burnt.
- Reduce the heat to 350°F and bake for an additional 30 minutes, until crust has browned and filling is bubbly. Remove from oven and place on a wire rack. Cool completely before serving.
- Enjoy 😉
Note: I had left over dough from using cookie cutters for top crust, so I just made a mini pie on the side.
Emily Smith is the Editor of The Best of This Life who has been writing in the lifestyle niche and creating delicious recipes for over 10 years. Her work has been featured on BRIT + CO, Today's Parent, Chatelaine, Huffington Post, The Pioneer Woman, and Food Bloggers of Canada. She writes about family, food, entertaining, home decor, wellness, travel and a litany of other topics. She loves sharing her three core values - love life, live well, share the beauty - and encourages her readers to enjoy the best of their lives every day. She lives in Ottawa with her loving husband, two darling children, and dreams of one day owning a puppy.
Latest posts by Emily Smith (see all)
- Elevate Your Gift-Giving with Timeless Pieces from Vincero - February 5, 2024
- The Glow Up: Elevate Your Skincare - January 26, 2024
- Enjoy the Health Benefits of Smoothies - January 3, 2024
This pie is gorgeous and would be perfect with a cup of cocoa! 🙂
this looks awesome emily!!!!! Just need to pair it with some “ice cream” and it’d be an awesome fall desert. Can’t wait to try it.
That looks mighty fine! 🙂
http://tinajoathome.blogspot.se/
I MUST try this! Holy moly girlfriend! 🙂
Thanks Miss Jessica! It was pretty straight forward to make and I love using cookie cutters for the top pie crust – it’s lovely and EASY! 🙂
Sure thing, I love pies with the vanilla bean coconut ice cream (by bliss OR the recipe I made by scratch). Enjoy xo
Thank ya friend 😉
Hehehe, hope you do, it makes a great party dessert – everyone loves pie, right?
This looks delightful x
YUM! this looks sooooo good! The perfect fall dessert 😉
such a pretty pie! i love the leaves on top! such a cute touch!
oh my!
that pie looks delicious!