3 Easy DIY Projects You Can Make with Cricut Joy
This is a sponsored post written by me on behalf of Cricut. All opinions are 100% mine.
It’s no secret that for the last year, I have been having fun with Cricut! The world of cutting machines was new to me, but I’ve been learning as I go with my Cricut Maker and enjoying each craft session. I’ve learned how to make felt flowers, create personalized signs, and customize tableware!
And now, I’m so excited to discover what my new Cricut Joy can do! The Cricut Joy is Cricut’s smallest smart cutting machine that delivers big results. You can quickly and easily personalize just about anything with one cut and colour, in 15 minutes or less. Isn’t that amazing! It’s the perfect sidekick to my Cricut Maker for when I want to do quick, small cuts, mat-free projects, and long cuts.

Make Everyday Projects Quickly with the Cricut Joy
The Cricut Joy is lightweight, compact, and portable. Which means, you can set up wherever you want in your home that’s convenient for you. You can quickly make labels for your pantry storage containers in the kitchen, or create a small decorative print while watching a movie. Making everyday projects has never been easier, thanks to the Cricut Joy.
One of the many features I love about the Cricut Joy is that a mat is optional for many of the projects you can make. You can find new materials that do not require a mat, like Smart Vinyl which comes in extended sizes. You can cut up to 20′ without needing to switch out multiple mats. It’s ideal for creating beautiful signs!
Are you ready to see the three little things I made with my Circut Joy? Let’s jump in!
Somewhere Over The Rainbow Notebook
Here’s what you’ll need for this project:
- 1 notebook
- Cricut Joy
- Cricut Transfer Tape
- Cricut Joy Starter Tool Set
- Cricut Joy Smart Vinyl Sampler, Beachside – Permanent
Step 1: In Cricut Design Space, open up my “ Somewhere Over The Rainbow” template. I simply used the “Anytime” font to create the customized text. You can easily create your own text using a different font to personalize your notebook. Proceed with cutting – no mat required with Smart Vinyl!

Step 2: Once the text is cut, proceed with weeding it out.

Step 3: Use transfer tape to place the text onto the notebook. To help get a clean and smooth transfer, use a Cricut Scraper Tool to remove bubbling.
Step 4: For the adorable rainbow design, I used the image “Rainbow” from the Cutie Shapes series – #MCDD5F9F. I cut it at around 3’ x 2’. Repeat the steps from above to cut and transfer the image onto the notebook.

And just like that, you’re done. Isn’t it cute!
Spring In Bloom Mug
Here’s what you’ll need for this project:
- 1 mug
- Cricut Joy
- Cricut Transfer Tape
- Cricut Joy Starter Tool Set
- Cricut Joy Smart Vinyl Sampler, Beachside – Permanent
Step 1: In Cricut Design Space, open up my “Spring in Bloom” template. Adjust the sizes of the images according to your mug’s scale. Proceed with cutting – no mat required with Smart Vinyl! Choose the colours you want to use and follow the prompts in Cricut Design Space for cutting each layer.
Alternatively, you can create your own floral print. To do so, start a new project in Cricut Design Space. Click on images to find the flower and leaf designs you want to use. Adjust them to the size and scale that works for your mug and proceed with cutting. Follow the prompts in Cricut Design Space for cutting each layer.

Step 2: When all of your images have been cut, you can turn off the Cricut Joy and proceed with weeding. Use a Cricut Weeding Tool to carefully weed your images and get them ready for transferring.
Step 3: You’re almost there! Cut pieces of transfer tape that are slightly larger than your images. If you’re using the same flower image I did, it will require layering. Layer the first part of the image onto the transfer tape and then the second. To help get a clean and smooth transfer, use a Cricut Scraper Tool to remove bubbling.
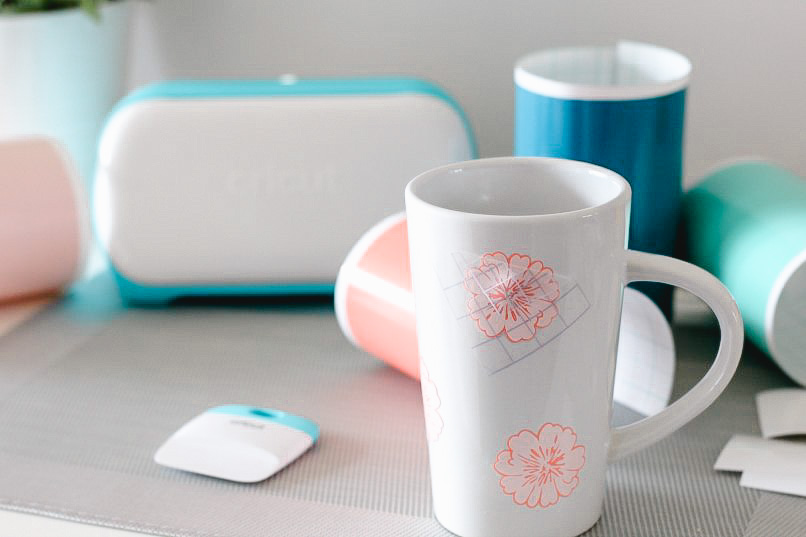
Step 4: Now it’s time to transfer the image onto the mug. Place each flower and leaf where you would like on the mug. Again, use one of Cricut’s Scraper Tool to get a clean and smooth transfer. Voila! It’s that easy.

I decided to only do the front of the mug. However, you can cut additional elements to cover the entire mug . I’m so happy with how this project turned out!
Happy Mother’s Day Card
This is a ready-made project available in Cricut Design Space that I couldn’t resist trying! I couldn’t believe how quick and easy it was to create such a beautiful, handmade card.
Here’s what you’ll need for this project:
- Cricut Joy
- Cricut Joy Starter Tool Set
- Cricut Joy Card Mat, 4.5″ x 6.25″
- Cricut Joy Insert Cards, New Romantic Sampler
Step 1: In Cricut Design Space, open up the “Happy Mother’s Day Card” project.

Step 2: Set up the card stock on the card mat. Follow the prompts in Cricut Design Space for cutting.

Step 3: Use a Cricut Weeding Tool to weed and discard the cutouts. Gently remove the card stock from the mat.

Step 4: Add the coloured insert and you’re all set. What a beautiful card for Mother’s Day!

Everyday Projects Made Easy!
These three little projects are a fun way to get started with Cricut Joy. The sky is the limit when it comes to what you can create.
With the convenience of a smaller cutting machine that’s lightweight and portable, you can cut and craft almost anywhere! The Cricut Joy is fast and easy to setup and it looks great wherever you put it.
Even if you already have a Cricut machine, the Cricut Joy is a valuable addition to your maker tool box. It allows you to cut without a mat and complete everyday projects quicker. With the New Smart Vinyl, available in extended sizes up to 20′ , you no longer need to with out multiple mats! You’ll get convenience, accessibility, and a whole lot of fun.
The Cricut Joy is now available only and in-store! To learn more visit Cricut.com
Happy crafting friends!
- Best Coffee Shops in Ottawa for Cozy Vibes - May 28, 2026
- Way Day Early Deals Are Here (And Yes, They’re Worth Shopping) - April 20, 2026
- Kitchen Organization Essentials I Actually Use - February 5, 2026


